To connect the system, go to: //Project Settings/Maps & Mode/
Select the following settings:
Default GameMode - BP_GameMode
Editor Startup Map - Demo
Game Default Map - Demo
Connecting your character
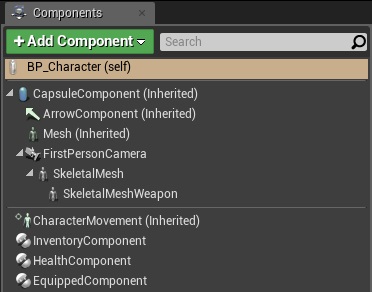
To connect a new character, you need to add 3 components, a camera, and 2 skeletons from the standard character shown in the screenshot:
Add an interface BP_Interface, and connect the components in the same way as in the standard interface characters Set Player Speed, Set All Skeletal Mesh. After that, the character is completely ready and it can be connected to BP_GameMode to use.
Parent classes
These parent classes are used to add new items to the inventory:
BP_MasterItem - The main parent class for all inventory items
BP_MasterEquip - Parent class for all equipped inventory items
BP_MasterClothes - Parent clothing class
BP_MasterWeapon - Parent Weapon Class
BP_MasterAmmo - Parent class of ammunition for weapons
BP_MasterStorage - Parent class of all chests
BP_MasterTrade - The parent class of all vending machines
Creating new items
To create a new item, select the parent class that is most suitable for this item and create a child element. To do this, right-click on the parent class and select the first button Create Child Blueprint Class. Give the created item a name and then go to its settings which are stored in the structure S_ItemInfo:
Equipped_Type - Type of equipped item
Name - Item name
Rename - Is it possible to rename an item
Description - Item description
Icon - Item Icon
Wheel Supports - Can I add it to the quick access wheel
Max Condition - Maximum strength
Weight - Item weight
UseText - The text of the use of the item
On Equip Text - The text of removing the item
CanBeStacked? - Does the object stack
canBeUsed? - Can I use
Variable? - Is it possible to change the subject
Droped? - Is it possible to throw away an item
Equipped - Is it possible to equip an item
WorldStaticMesh - 3D model of an object in the world
PhisycMass - The weight of the item in the world
CraftAmount - The amount obtained during crafting
Trade - Is it possible to sell
Purchase price - Purchase price
Sale price - Sale price
Pecipe - The necessary items for crafting this
Repeir - The necessary items to repair this
The sorting settings for the item are in the structure S_Sorting_Info:
Categories - Subject category
Layer Sorting - The layer in which the object is located
Order Sort - The selected location in the layer. Maximum of 266 places for each layer
In order to assign any actions during the use of an item, an event is provided in it Event On Used an example of the use of which is shown in the screenshot:
Interfaces
The system uses plug-in interfaces:
BP_Interact - Displays the name of an item in the world, interacts with it by pressing a key, passes an inventory component
BP_Interfase - Transmits information about the character
BP_InventoryWidget_Interfase - Transmits information in widgets
To work, just add the interface to any Actor and connect the necessary parameters:
Lists of settings
E_Layer_Sorting - Layers for sorting
E_Type_Sort_In_Layer - Sort type for each layer
E_OrderSort - Contains items to sort within the layer
E_Categories - The category of the item to sort
E_Equipped - Equipment Slots
E_TrowSettings - Types of settings of the quantity selection window
E_TypeInventory - Types of inventory displayed
E_TypeRequirements - Types of slots displaying numbers
Functions
Add Item - Adds items to the inventory
Remove Item At Index - Removes an item from the inventory
Swap Item - Transfers an item from one inventory to another
Add Wheel Index - Adds an item for quick use
Remove Wheel Index - Removes the item from quick use
Remove Select Item - Finds the specified number of items and removes them from the inventory
Get Total Amount Of Item - Finds all the specified items in the inventory and their number
Update World Storage - Loads items in the inventory
There are also other inventory management functions that are in the BP_InventoryComponent, B_InventoryFunction, BP_InventoryMacro, BP_ObjectMacro in the sections Set and Get
Sorting
Sorting settings are located in the functions of the component BP_InventoryComponent:
Get is Rev Layer Sorting Settings - Allows you to select which layer will be sorted in reverse order
Sorting Settings - Allows you to select the sorting type for each layer
Get Sorting Index - Additional sorting options can be added to this function. For example , damage or defense
Additionally
BP_SpawnItem - Creates items in the world by timer
BP_DamagZone - Deals damage to the character
BP_Craft - When interacting, it opens the workbench
Equipment Settings - Located in the component BP_EquippedComponent and it serves to select the number of items that can be equipped in this slot. For example, 1 weapon and 5 rings